Trong bài viết sau, NQ News sẽ hướng dẫn, giải thích với các bạn cách cài đặt hệ thống mail server dựa trên Postfix – được xây dựng trên tài khoản user và domain ảo (ví dụ 2 giá trị này được lưu trữ trong cơ sở dữ liệu MySQL). Đồng thời chúng tôi cũng xây dựng lại toàn bộ quá trình cài đặt và thiết lập của Courier (Courier-POP3, Courier-IMAP), qua đó Courier có thể nhận dạng được luồng thông tin dữ liệu tương tự như MySQL.
Kết quả của Postfix server là khả năng hỗ trợ cơ chế xác thực SMTP-AUTH, TLS và quota (quota không được tích hợp cùng với Postfix ở chế độ mặc định), trong đó mật khẩu sẽ được lưu trữ dưới mẫu encrypted trong cơ sở dữ liệu. Bên cạnh đó, bài viết cũng sẽ chỉ ra cách cài đặt Amavisd, SpamAssassin và ClamAV để quét email và phát hiện các hiểm họa đi kèm.
Lưu ý sơ bộ
Hệ thống sử dụng ở đây dựa trên nền tảng Fedora 13 server x86_64, có địa chỉ IP tĩnh192.168.0.100 và hostname là server1.example.com. Thêm vào đó, tắt bỏ tính năng firewall và SELinux.
Cài đặt 1 số phần mềm yêu cầu
Trước tiên, chúng ta cần cập nhật 1 số gói ứng dụng trên hệ thống:
yum update
yum groupinstall ‘Development Tools’
yum groupinstall ‘Development Libraries’
Cài đặt Apache, MySQL, phpMyAdmin
Chỉ với 1 dòng lệnh duy nhất, có bao gồm các gói cần thiết để xây dựng hệ thống Courier-IMAP sau này:
yum install ntp httpd mysql-server php php-mysql php-mbstring rpm-build gcc mysql-devel openssl-devel cyrus-sasl-devel pkgconfig zlib-devel phpMyAdmin pcre-devel openldap-devel postgresql-devel expect libtool-ltdl-devel openldap-servers libtool gdbm-devel pam-devel gamin-devel
Cài đặt Courier-IMAP, Courier-Authlib, và Maildrop
Thật bất tiện khi không có gói rpm dành cho Courier-IMAP, Courier-Authlib, và Maildrop, do đó chúng ta cần tự xây dựng mã nguồn. Chú ý rằng các gói RPM không nên được dựng bằng tài khoản root, courier-imap sẽ tự động tắt bỏ khỏi quá trình biên dịch nếu phát hiện trình biên dịch đang thực hiện bằng tài khoản root. Do đó, chúng ta cần tạo 1 tài khoản bình thường (trong ví dụ này là falko) và tạo mật khẩu đi kèm:
useradd -m -s /bin/bash falko
passwd falko
Chúng ta sẽ cần đến cú pháp sudo sau này, để tài khoản falco có thể biên dịch và cài đặt các gói rpm. Nhưng trước tiên, chúng ta phải cho phép tài khoản falko để chạy tất cả câu lệnh sử dụng sudo:
visudo
Trong file vừa mở ra, sẽ có dòng root ALL=(ALL) ALL. Hãy thêm 1 dòng tương tự dành cho falko ngay bên dưới:
[…]
## Allow root to run any commands anywhere
root ALL=(ALL) ALL
falko ALL=(ALL) ALL
[…]
Và bây giờ, chúng ta đã sẵn sàng xây dựng các gói rpm. Trước tiên, đăng nhập vào tài khoản falko:
su falko
Tạo các biến môi trường:
mkdir $HOME/rpm
mkdir $HOME/rpm/SOURCES
mkdir $HOME/rpm/SPECS
mkdir $HOME/rpm/BUILD
mkdir $HOME/rpm/BUILDROOT
mkdir $HOME/rpm/SRPMS
mkdir $HOME/rpm/RPMS
mkdir $HOME/rpm/RPMS/i386
mkdir $HOME/rpm/RPMS/x86_64echo “%_topdir $HOME/rpm” >> $HOME/.rpmmacros
Tạo tiếp thư mục downloads và tải bộ mã nguồn từ đây:
mkdir $HOME/downloads
cd $HOME/downloadswget https://sourceforge.net/projects/courier/files/authlib/0.63.0/courier-authlib-0.63.0.tar.bz2/download
wget https://sourceforge.net/projects/courier/files/imap/4.8.0/courier-imap-4.8.0.tar.bz2/download
wget https://sourceforge.net/projects/courier/files/maildrop/2.5.0/maildrop-2.5.0.tar.bz2/download
Vẫn ở trong thư mục $HOME/downloads, xây dựng gói courier-authlib:
sudo rpmbuild -ta courier-authlib-0.63.0.tar.bz2
Sau đó, gói rpm sẽ có trong $HOME/rpm/RPMS/x86_64 ($HOME/rpm/RPMS/i386 nếu bạn sử dụng i386):
cd $HOME/rpm/RPMS/x86_64
Sử dụng lệnh:
ls -l
để liệt kê các gói rpm thích hợp:
[falko@server1 x86_64]$ ls -l
total 516
-rw-r–r– 1 root root 124304 Jun 10 17:48 courier-authlib-0.63.0-1.fc13.x86_64.rpm
-rw-r–r– 1 root root 258896 Jun 10 17:48 courier-authlib-debuginfo-0.63.0-1.fc13.x86_64.rpm
-rw-r–r– 1 root root 35064 Jun 10 17:48 courier-authlib-devel-0.63.0-1.fc13.x86_64.rpm
-rw-r–r– 1 root root 17424 Jun 10 17:48 courier-authlib-ldap-0.63.0-1.fc13.x86_64.rpm
-rw-r–r– 1 root root 13956 Jun 10 17:48 courier-authlib-mysql-0.63.0-1.fc13.x86_64.rpm
-rw-r–r– 1 root root 13120 Jun 10 17:48 courier-authlib-pgsql-0.63.0-1.fc13.x86_64.rpm
-rw-r–r– 1 root root 8328 Jun 10 17:48 courier-authlib-pipe-0.63.0-1.fc13.x86_64.rpm
-rw-r–r– 1 root root 34160 Jun 10 17:48 courier-authlib-userdb-0.63.0-1.fc13.x86_64.rpm
[falko@server1 x86_64]$
Chọn 1 gói thích hợp và cài đặt như sau:
sudo rpm -ivh courier-authlib-0.63.0-1.fc13.x86_64.rpm courier-authlib-mysql-0.63.0-1.fc13.x86_64.rpm courier-authlib-devel-0.63.0-1.fc13.x86_64.rpm
Tiếp theo, quay trở lại thư mục downloads:
cd $HOME/downloads
và chạy lệnh rpmbuild lại lần nữa, nhưng không có sudo nếu không quá trình biên dịch sẽ thất bại:
rpmbuild -ta courier-imap-4.8.0.tar.bz2
Sau quá trình này, gói rpm sẽ được tìm thấy trong thư mục HOME/rpm/RPMS/x86_64 ($HOME/rpm/RPMS/i386 nếu bạn đang sử dụng hệ thống i386):
cd $HOME/rpm/RPMS/x86_64
Dùng lệnh:
ls -l
sẽ liệt kê ra các gói rpm phù hợp:
[falko@server1 x86_64]$ ls -l
total 2300
-rw-r–r– 1 root root 124304 Jun 10 17:48 courier-authlib-0.63.0-1.fc13.x86_64.rpm
-rw-r–r– 1 root root 258896 Jun 10 17:48 courier-authlib-debuginfo-0.63.0-1.fc13.x86_64.rpm
-rw-r–r– 1 root root 35064 Jun 10 17:48 courier-authlib-devel-0.63.0-1.fc13.x86_64.rpm
-rw-r–r– 1 root root 17424 Jun 10 17:48 courier-authlib-ldap-0.63.0-1.fc13.x86_64.rpm
-rw-r–r– 1 root root 13956 Jun 10 17:48 courier-authlib-mysql-0.63.0-1.fc13.x86_64.rpm
-rw-r–r– 1 root root 13120 Jun 10 17:48 courier-authlib-pgsql-0.63.0-1.fc13.x86_64.rpm
-rw-r–r– 1 root root 8328 Jun 10 17:48 courier-authlib-pipe-0.63.0-1.fc13.x86_64.rpm
-rw-r–r– 1 root root 34160 Jun 10 17:48 courier-authlib-userdb-0.63.0-1.fc13.x86_64.rpm
-rw-r–r– 1 falko falko 632296 Jun 10 17:58 courier-imap-4.8.0-1.13.x86_64.rpm
-rw-r–r– 1 falko falko 1188976 Jun 10 17:58 courier-imap-debuginfo-4.8.0-1.13.x86_64.rpm
[falko@server1 x86_64]$
Và cài đặt courier-imap như sau:
sudo rpm -ivh courier-imap-4.8.0-1.13.x86_64.rpm
Quay trở lại thư mục downloads:
cd $HOME/downloads
tiếp tục chạy lệnh rpmbuild, lần này là để xây dựng gói maildrop:
sudo rpmbuild -ta maildrop-2.5.0.tar.bz2
Khi hoàn thành, gói rpm sẽ có trong thư mục $HOME/rpm/RPMS/x86_64 ($HOME/rpm/RPMS/i386 nếu bạn sử dụng hệ thống i386):
cd $HOME/rpm/RPMS/x86_64
Gõ lệnh:
ls -l
để liệt kê các gói phù hợp:
[falko@server1 x86_64]$ ls -l
total 5400
-rw-r–r– 1 root root 124304 Jun 10 17:48 courier-authlib-0.63.0-1.fc13.x86_64.rpm
-rw-r–r– 1 root root 258896 Jun 10 17:48 courier-authlib-debuginfo-0.63.0-1.fc13.x86_64.rpm
-rw-r–r– 1 root root 35064 Jun 10 17:48 courier-authlib-devel-0.63.0-1.fc13.x86_64.rpm
-rw-r–r– 1 root root 17424 Jun 10 17:48 courier-authlib-ldap-0.63.0-1.fc13.x86_64.rpm
-rw-r–r– 1 root root 13956 Jun 10 17:48 courier-authlib-mysql-0.63.0-1.fc13.x86_64.rpm
-rw-r–r– 1 root root 13120 Jun 10 17:48 courier-authlib-pgsql-0.63.0-1.fc13.x86_64.rpm
-rw-r–r– 1 root root 8328 Jun 10 17:48 courier-authlib-pipe-0.63.0-1.fc13.x86_64.rpm
-rw-r–r– 1 root root 34160 Jun 10 17:48 courier-authlib-userdb-0.63.0-1.fc13.x86_64.rpm
-rw-r–r– 1 falko falko 632296 Jun 10 17:58 courier-imap-4.8.0-1.13.x86_64.rpm
-rw-r–r– 1 falko falko 1188976 Jun 10 17:58 courier-imap-debuginfo-4.8.0-1.13.x86_64.rpm
-rw-r–r– 1 root root 1759056 Jun 10 18:06 maildrop-2.5.0-1.13.x86_64.rpm
-rw-r–r– 1 root root 1243400 Jun 10 18:06 maildrop-debuginfo-2.5.0-1.13.x86_64.rpm
-rw-r–r– 1 root root 99764 Jun 10 18:06 maildrop-devel-2.5.0-1.13.x86_64.rpm
-rw-r–r– 1 root root 62536 Jun 10 18:06 maildrop-man-2.5.0-1.13.x86_64.rpm
[falko@server1 x86_64]$
Và cài đặt maildrop như sau:
sudo rpm -ivh maildrop-2.5.0-1.13.x86_64.rpm
Sau khi hoàn tất các quá trình trên, đăng nhập vào hệ thống bằng tài khoản root:
exit
Áp dụng bản vá Quote với Postfix
Ở đây, chúng ta sẽ phải tìm cách patch Quota với Postfix theo cách sau: tải mã nguồn, áp dụng bản vá, xây dựng gói cài đặt rpm của Postfix và cài đặt:
cd /usr/src
wget http://ftp-stud.fht-esslingen.de/pub/Mirrors/fedora/linux/releases/13/Fedora/source/SRPMS/postfix-2.7.0-1.fc13.src.rpm
rpm -ivh postfix-2.7.0-1.fc13.src.rpm
Câu lệnh cuối cùng sẽ chỉ ra 1 vài cảnh báo, bạn có thể bỏ qua những cảnh báo này:
warning: user mockbuild does not exist – using root
warning: group mockbuild does not exist – using rootcd /root/rpmbuild/SOURCES
wget http://vda.sourceforge.net/VDA/postfix-vda-2.7.0.patch
cd /root/rpmbuild/SPECS/
Tiếp theo, chỉnh sửa file postfix.spec:
vi postfix.spec
Thêm cú pháp Patch0: postfix-vda-2.7.0.patch vào vị trí # Patches, và %patch0 -p1 -b .vda vào %setup -q:
[…]
# PatchesPatch0: postfix-vda-2.7.0.patch
Patch1: postfix-2.7.0-config.patch
Patch2: postfix-2.6.1-files.patch
Patch3: postfix-alternatives.patch
Patch8: postfix-large-fs.patch
Patch9: pflogsumm-1.1.2-datecalc.patch
[…]
%prep
%setup -q
# Apply obligatory patches
%patch0 -p1 -b .vda
%patch1 -p1 -b .config
%patch2 -p1 -b .files
%patch3 -p1 -b .alternatives
%patch8 -p1 -b .large-fs
[…]
Sau đó, xây dựng gói cài đặt rpm của Postfix với quota và MySQL hỗ trợ:
rpmbuild -ba postfix.spec
Gói rpm cài đặt Postfix được tạo ra ở thư mục /root/rpmbuild/RPMS/x86_64 (/root/rpmbuild/RPMS/i386 nếu bạn sử dụng hệ thống i386):
cd /root/rpmbuild/RPMS/x86_64
Sử dụng lệnh:
ls -l
để liệt kê các gói phù hợp:
[root@server1 x86_64]# ls -l
total 8804
-rw-r–r– 1 root root 2197708 Jun 10 18:17 postfix-2.7.0-1.fc13.x86_64.rpm
-rw-r–r– 1 root root 6746304 Jun 10 18:17 postfix-debuginfo-2.7.0-1.fc13.x86_64.rpm
-rw-r–r– 1 root root 61460 Jun 10 18:17 postfix-perl-scripts-2.7.0-1.fc13.x86_64.rpm
[root@server1 x86_64]#
Chọn gói Postfix phù hợp và cài đặt bằng lệnh sau:
rpm -ivh postfix-2.7.0-1.fc13.x86_64.rpm
Thiết lập mật khẩu cho MySQL và thiết lập phpMyAdmin
Khởi động MySQL:
chkconfig –levels 235 mysqld on
/etc/init.d/mysqld start
Thiết lập mật khẩu cho tài khoản MySQL root:
mysql_secure_installation
[root@server1 ~]# mysql_secure_installation
NOTE: RUNNING ALL PARTS OF THIS SCRIPT IS RECOMMENDED FOR ALL MySQL
SERVERS IN PRODUCTION USE! PLEASE READ EACH STEP CAREFULLY!In order to log into MySQL to secure it, we’ll need the current
password for the root user. If you’ve just installed MySQL, and
you haven’t set the root password yet, the password will be blank,
so you should just press enter here.Enter current password for root (enter for none): <-- ENTER
OK, successfully used password, moving on…Setting the root password ensures that nobody can log into the MySQL
root user without the proper authorisation.Set root password? [Y/n] <-- ENTER
New password: ← đặt mật khẩu root sql
Re-enter new password: <-- đặt mật khẩu root sql
Password updated successfully!
Reloading privilege tables..
… Success!By default, a MySQL installation has an anonymous user, allowing anyone
to log into MySQL without having to have a user account created for
them. This is intended only for testing, and to make the installation
go a bit smoother. You should remove them before moving into a
production environment.Remove anonymous users? [Y/n] <-- ENTER
… Success!Normally, root should only be allowed to connect from ‘localhost’. This
ensures that someone cannot guess at the root password from the network.Disallow root login remotely? [Y/n] <-- ENTER
… Success!By default, MySQL comes with a database named ‘test’ that anyone can
access. This is also intended only for testing, and should be removed
before moving into a production environment.Remove test database and access to it? [Y/n] <-- ENTER
– Dropping test database…
… Success!
– Removing privileges on test database…
… Success!Reloading the privilege tables will ensure that all changes made so far
will take effect immediately.Reload privilege tables now? [Y/n] <-- ENTER
… Success!Cleaning up…
All done! If you’ve completed all of the above steps, your MySQL
installation should now be secure.Thanks for using MySQL!
[root@server1 ~]#
Tiếp theo, chúng ta phải thiết lập phpMyAdmin, thay đổi Apache để phpMyAdmin chấp nhận các kết nối không chỉ từ localhost:
vi /etc/httpd/conf.d/phpMyAdmin.conf
# phpMyAdmin – Web based MySQL browser written in php
#
# Allows only localhost by default
#
# But allowing phpMyAdmin to anyone other than localhost should be considered
# dangerous unless properly secured by SSLAlias /phpMyAdmin /usr/share/phpMyAdmin
Alias /phpmyadmin /usr/share/phpMyAdmin
#
# order deny,allow
# deny from all
# allow from 127.0.0.1
# allow from ::1
## This directory does not require access over HTTP – taken from the original
# phpMyAdmin upstream tarball
#
Order Deny,Allow
Deny from All
Allow from None
# This configuration prevents mod_security at phpMyAdmin directories from
# filtering SQL etc. This may break your mod_security implementation.
#
#
#
# SecRuleInheritance Off
#
#
Tạo đường dẫn khởi động cho Apache và kích hoạt:
chkconfig –levels 235 httpd on
/etc/init.d/httpd start
Mở trình duyệt và gõ địa chỉ http://server1.example.com/phpMyAdmin/ hoặc http://192.168.0.100/phpMyAdmin/, đăng nhập bằng tài khoản root và mật khẩu MySQL khai báo ở phía trên.
Tạo cơ sở dữ liệu MySQL dành cho Postfix/Courier
Ở đây, chúng ta sẽ tạo cơ sở dữ liệu với tên là mail:
mysqladmin -u root -p create mail
Di chuyển tới MySQL shell:
mysql -u root -p
Và tại đây, chúng ta sẽ tạo tài khoản mail_admin với mật khẩu mail_admin_password (thay thế với mật khẩu tùy chọn của bạn) với những quyền cơ bản như SELECT, INSERT, UPDATE, DELETE trên cơ sở dữ liệu mail. Tài khoản này sẽ được Postfix và Courier sử dụng để kết nối tới cơ sở dữ liệu mail:
GRANT SELECT, INSERT, UPDATE, DELETE ON mail.* TO ‘mail_admin’@’localhost’ IDENTIFIED BY ‘mail_admin_password’;
GRANT SELECT, INSERT, UPDATE, DELETE ON mail.* TO ‘mail_admin’@’localhost.localdomain’ IDENTIFIED BY ‘mail_admin_password’;
FLUSH PRIVILEGES;
Tạo tiếp những bảng mà Postfix và Courier cần:
USE mail;
CREATE TABLE domains (
domain varchar(50) NOT NULL,
PRIMARY KEY (domain) )
TYPE=MyISAM;CREATE TABLE forwardings (
source varchar(80) NOT NULL,
destination TEXT NOT NULL,
PRIMARY KEY (source) )
TYPE=MyISAM;CREATE TABLE users (
email varchar(80) NOT NULL,
password varchar(20) NOT NULL,
quota bigint(20) DEFAULT ‘10485760’,
PRIMARY KEY (email)
) TYPE=MyISAM;CREATE TABLE transport (
domain varchar(128) NOT NULL default ”,
transport varchar(128) NOT NULL default ”,
UNIQUE KEY domain (domain)
) TYPE=MyISAM;quit;
Với câu lệnh quit; chúng ta sẽ thoát khỏi MySQL shell và quay trở lại Linux shell.
Bảng dữ liệu domains sẽ lưu trữ mỗi domain ảo mà Postfix sử dụng để nhận email (ví dụ example.com).
Bảng forwardings dành cho các email trỏ tới email khác, ví dụ trỏ từ info@example.com tới sales@example.com
Bảng users lưu trữ tất cả thông tin tài khoản ảo và mật khẩu cùng giá trị quota dành cho mail box (trong ví dụ này là giá trị mặc định 10485760 bytes tương đương với 10MB).
Bảng transport là lựa chọn thêm, dành cho những người dùng nâng cao, cho phép chuyển tiếp mail đối với mỗi người dùng đơn lẻ, hoặc toàn bộ domain cũng như tất cả mail tới server khác.
Điều chỉnh Postfix
Tiếp theo, chúng ta phải chỉ ra cho Postfix tìm tất cả các thông tin trong cơ sở dữ liệu, do đó chúng ta phải tạo 6 file text. Postfix sẽ kết nối tới MySQL bằng địa chỉ IP: 127.0.0.1 bên trong localhost:
vi /etc/postfix/mysql-virtual_domains.cf
user = mail_admin
password = mail_admin_password
dbname = mail
query = SELECT domain AS virtual FROM domains WHERE domain=’%s’
hosts = 127.0.0.1
vi /etc/postfix/mysql-virtual_forwardings.cfuser = mail_admin
password = mail_admin_password
dbname = mail
query = SELECT destination FROM forwardings WHERE source=’%s’
hosts = 127.0.0.1
vi /etc/postfix/mysql-virtual_mailboxes.cfuser = mail_admin
password = mail_admin_password
dbname = mail
query = SELECT CONCAT(SUBSTRING_INDEX(email,’@’,-1),’/’,SUBSTRING_INDEX(email,’@’,1),’/’) FROM users WHERE email=’%s’
hosts = 127.0.0.1
vi /etc/postfix/mysql-virtual_email2email.cfuser = mail_admin
password = mail_admin_password
dbname = mail
query = SELECT email FROM users WHERE email=’%s’
hosts = 127.0.0.1
vi /etc/postfix/mysql-virtual_transports.cfuser = mail_admin
password = mail_admin_password
dbname = mail
query = SELECT transport FROM transport WHERE domain=’%s’
hosts = 127.0.0.1
vi /etc/postfix/mysql-virtual_mailbox_limit_maps.cfuser = mail_admin
password = mail_admin_password
dbname = mail
query = SELECT quota FROM users WHERE email=’%s’
hosts = 127.0.0.1
chmod o= /etc/postfix/mysql-virtual_*.cf
chgrp postfix /etc/postfix/mysql-virtual_*.cf
Tạo tài khoản người dùng và nhóm có tên là vmail cùng thư mục gốc /home/vmail. Đây sẽ là nơi lưu trữ tất cả mail box.
groupadd -g 5000 vmail
useradd -g vmail -u 5000 vmail -d /home/vmail -m
Tiếp theo, chúng ta tiến hành chỉnh sửa 1 vài thông số của Postfix, hãy chắc chắn rằng bạn đã thay thế đúng giá trị server1.example.com với FQDN tương ứng, nếu không Postfix sẽ không hoạt động bình thường:
postconf -e ‘myhostname = server1.example.com’
postconf -e ‘mydestination = server1.example.com, localhost, localhost.localdomain’
postconf -e ‘mynetworks = 127.0.0.0/8’
postconf -e ‘virtual_alias_domains =’
postconf -e ‘ virtual_alias_maps = proxy:mysql:/etc/postfix/mysql-virtual_forwardings.cf, mysql:/etc/postfix/mysql-virtual_email2email.cf’
postconf -e ‘virtual_mailbox_domains = proxy:mysql:/etc/postfix/mysql-virtual_domains.cf’
postconf -e ‘virtual_mailbox_maps = proxy:mysql:/etc/postfix/mysql-virtual_mailboxes.cf’
postconf -e ‘virtual_mailbox_base = /home/vmail’
postconf -e ‘virtual_uid_maps = static:5000’
postconf -e ‘virtual_gid_maps = static:5000’
postconf -e ‘smtpd_sasl_auth_enable = yes’
postconf -e ‘broken_sasl_auth_clients = yes’
postconf -e ‘smtpd_sasl_authenticated_header = yes’
postconf -e ‘smtpd_recipient_restrictions = permit_mynetworks, permit_sasl_authenticated, reject_unauth_destination’
postconf -e ‘smtpd_use_tls = yes’
postconf -e ‘smtpd_tls_cert_file = /etc/postfix/smtpd.cert’
postconf -e ‘smtpd_tls_key_file = /etc/postfix/smtpd.key’
postconf -e ‘transport_maps = proxy:mysql:/etc/postfix/mysql-virtual_transports.cf’
postconf -e ‘virtual_create_maildirsize = yes’
postconf -e ‘virtual_maildir_extended = yes’
postconf -e ‘virtual_mailbox_limit_maps = proxy:mysql:/etc/postfix/mysql-virtual_mailbox_limit_maps.cf’
postconf -e ‘virtual_mailbox_limit_override = yes’
postconf -e ‘virtual_maildir_limit_message = “The user you are trying to reach is over quota.”‘
postconf -e ‘virtual_overquota_bounce = yes’
postconf -e ‘proxy_read_maps = $local_recipient_maps $mydestination $virtual_alias_maps $virtual_alias_domains $virtual_mailbox_maps $virtual_mailbox_domains $relay_recipient_maps $relay_domains $canonical_maps $sender_canonical_maps $recipient_canonical_maps $relocated_maps $transport_maps $mynetworks $virtual_mailbox_limit_maps’
postconf -e ‘inet_interfaces = all’
Sau đó tạo cơ chế xác thực SSL cần thiết đối với TLS:
cd /etc/postfix
openssl req -new -outform PEM -out smtpd.cert -newkey rsa:2048 -nodes -keyout smtpd.key -keyform PEM -days 365 -x509Country Name (2 letter code) [XX]:
State or Province Name (full name) []:
Locality Name (eg, city) [Default City]:
Organization Name (eg, company) [Default Company Ltd]:
Organizational Unit Name (eg, section) []:
Common Name (eg, your name or your server’s hostname) []:
Email Address []:
Sau đó thay đổi giới hạn quyền của smtpd.key:
chmod o= /etc/postfix/smtpd.key
Điều chỉnh Saslauthd
Thay đổi /usr/lib64/sasl2/smtpd.conf (/usr/lib/sasl2/smtpd.conf nếu bạn sử dụng hệ thống i386), sẽ trông giống thế này:
vi /usr/lib64/sasl2/smtpd.conf
pwcheck_method: authdaemond
log_level: 3
mech_list: PLAIN LOGIN
authdaemond_path:/var/spool/authdaemon/socket
Tắt bỏ chức năng Sendmail và khởi động Postfix, saslauthd, và courier-authlib:
chmod 755 /var/spool/authdaemon
chkconfig –levels 235 courier-authlib on
/etc/init.d/courier-authlib startchkconfig –levels 235 sendmail off
chkconfig –levels 235 postfix on
chkconfig –levels 235 saslauthd on
/etc/init.d/sendmail stop
/etc/init.d/postfix start
/etc/init.d/saslauthd start
Điều chỉnh Courier
Tiếp theo, chúng ta cần chỉ định Courier xác thực thông tin nhận dạng từ cơ sở dữ liệu MySQL. Trước tiên, chỉnh sửa file /etc/authlib/authdaemonrc và thay thế giá trị authmodulelist:
vi /etc/authlib/authdaemonrc
[…]
authmodulelist=”authmysql”
#authmodulelist=”authuserdb authpam authpgsql authldap authmysql authcustom authpipe”
[…]
Tiếp tục chỉnh sửa file /etc/authlib/authmysqlrc:
cp /etc/authlib/authmysqlrc /etc/authlib/authmysqlrc_orig
cat /dev/null > /etc/authlib/authmysqlrc
vi /etc/authlib/authmysqlrcMYSQL_SERVER localhost
MYSQL_USERNAME mail_admin
MYSQL_PASSWORD mail_admin_password
MYSQL_PORT 0
MYSQL_DATABASE mail
MYSQL_USER_TABLE users
MYSQL_CRYPT_PWFIELD password
#MYSQL_CLEAR_PWFIELD password
MYSQL_UID_FIELD 5000
MYSQL_GID_FIELD 5000
MYSQL_LOGIN_FIELD email
MYSQL_HOME_FIELD “/home/vmail”
MYSQL_MAILDIR_FIELD CONCAT(SUBSTRING_INDEX(email,’@’,-1),’/’,SUBSTRING_INDEX(email,’@’,1),’/’)
#MYSQL_NAME_FIELD
MYSQL_QUOTA_FIELD quota
Sau đó khởi động lại Courier:
chkconfig –levels 235 courier-imap on
/etc/init.d/courier-authlib restart
/etc/init.d/courier-imap restart
Khi courier-imap khởi động lần đầu tiên, ứng dụng sẽ tự động tạo file xác thực /usr/lib/courier-imap/share/imapd.pem và usr/lib/courier-imap/share/pop3d.pem từ file /usr/lib/courier-imap/etc/imapd.cnf và /usr/lib/courier-imap/etc/pop3d.cnf. Vì file .cnf chứa dòng tham số CN=localhost, nhưng server của chúng ta lại có tên dạng server1.example.com, và quá trình xác thực sẽ xảy ra vấn đề khi sử dụng kết nối TLS. Để giải quyết việc này, ta xóa bỏ cả 2 file trên:
cd /usr/lib/courier-imap/share
rm -f imapd.pem
rm -f pop3d.pem
và thay thế dòng CN=localhost trong /usr/lib/courier-imap/etc/imapd.cnf và /usr/lib/courier-imap/etc/pop3d.cnf với CN=server1.example.com:
vi /usr/lib/courier-imap/etc/imapd.cnf
[…]
CN=server1.example.com
[…]
vi /usr/lib/courier-imap/etc/pop3d.cnf[…]
CN=server1.example.com
[…]
Sau đó tạo lại cả 2 file xác thực:
./mkimapdcert
./mkpop3dcert
khởi động lại restart courier-authlib và courier-imap:
/etc/init.d/courier-authlib restart
/etc/init.d/courier-imap restart
Chạy lệnh:
telnet localhost pop3
để kiểm tra xem POP3 server có hoạt động bình thường hay không. Kết quả trả về sẽ có dạng như +OK Hello there (gõ quit để quay trở lại Linux shell)
[root@server1 share]# telnet localhost pop3
Trying ::1…
Connected to localhost.
Escape character is ‘^]’.
+OK Hello there.
quit
+OK Better luck next time.
Connection closed by foreign host.
[root@server1 share]#
Chỉnh sửa /etc/aliases
Bây giờ, chúng ta sẽ mở file /etc/aliases. Hãy chắc chắn rằng biến postmaster trỏ tới tài khoản root như thế này:
vi /etc/aliases[…]
postmaster: root
root: postmaster@yourdomain.tld
[…]
hoặc như thế này (nếu là tài khoản administrator):[…]
postmaster: root
root: administrator
[…]Mỗi khi chỉnh sửa /etc/aliases, hãy chạy lệnh sau:
newaliases
và sau đó khởi động lại Postfix:
/etc/init.d/postfix restart
Cài đặt Amavisd-new, SpamAssassin và ClamAV
Để cài đặt những ứng dụng trên, sử dụng lệnh sau:
yum install amavisd-new spamassassin clamav clamav-data clamav-server clamav-update unzip bzip2
Tiếp theo, chỉnh sửa file /etc/amavisd/amavisd.conf:
vi /etc/amavisd/amavisd.conf
Trong file này, chúng ta sẽ chỉnh sửa 5 tham số:
Thứ nhất, đổi:
$mydomain = ‘example.com’; # a convenient default for other settings
thành:
$mydomain = ‘localhost’;
#$mydomain = ‘example.com’; # a convenient default for other settingsThứ 2, đổi:
$sa_tag_level_deflt = 2.0; # add spam info headers if at, or above that level
$sa_tag2_level_deflt = 6.2; # add ‘spam detected’ headers at that level
$sa_kill_level_deflt = 6.9; # triggers spam evasive actions (e.g. blocks mail)
$sa_dsn_cutoff_level = 10; # spam level beyond which a DSN is not sentthành:
$sa_tag_level_deflt = 2.0; # add spam info headers if at, or above that level
$sa_tag2_level_deflt = 4.0; # add ‘spam detected’ headers at that level
$sa_kill_level_deflt = $sa_tag2_level_deflt; # triggers spam evasive actions (e.g. blocks mail)
$sa_dsn_cutoff_level = 10; # spam level beyond which a DSN is not sent#$sa_tag_level_deflt = 2.0; # add spam info headers if at, or above that level
#$sa_tag2_level_deflt = 6.2; # add ‘spam detected’ headers at that level
#$sa_kill_level_deflt = 6.9; # triggers spam evasive actions (e.g. blocks mail)
#$sa_dsn_cutoff_level = 10; # spam level beyond which a DSN is not sentLưu ý: điều chỉnh tham số spam score theo ý thích
Thứ 3, đổi:
# @lookup_sql_dsn =
# ( [‘DBI:mysql:database=mail;host=127.0.0.1;port=3306’, ‘user1’, ‘passwd1’],
# [‘DBI:mysql:database=mail;host=host2’, ‘username2’, ‘password2’],
# [“DBI:SQLite:dbname=$MYHOME/sql/mail_prefs.sqlite”, ”, ”] );
# @storage_sql_dsn = @lookup_sql_dsn; # none, same, or separate databasethành:
# @lookup_sql_dsn =
# ( [‘DBI:mysql:database=mail;host=127.0.0.1;port=3306’, ‘user1’, ‘passwd1’],
# [‘DBI:mysql:database=mail;host=host2’, ‘username2’, ‘password2’],
# [“DBI:SQLite:dbname=$MYHOME/sql/mail_prefs.sqlite”, ”, ”] );
# @storage_sql_dsn = @lookup_sql_dsn; # none, same, or separate database@lookup_sql_dsn =
( [‘DBI:mysql:database=mail;host=127.0.0.1;port=3306’, ‘mail_admin’, ‘mail_admin_password’] );$sql_select_policy = ‘SELECT “Y” as local FROM domains WHERE CONCAT(“@”,domain) IN (%k)’;
$sql_select_white_black_list = undef; # undef disables SQL white/blacklisting
$recipient_delimiter = ‘+’; # (default is ‘+’)
$replace_existing_extension = 1; # (default is false)
$localpart_is_case_sensitive = 0; # (default is false)
Tiếp theo, đổi:
# $recipient_delimiter = ‘+’; # undef disables address extensions altogether
# when enabling addr extensions do also Postfix/main.cf: recipient_delimiter=+thành:
$recipient_delimiter = undef; # undef disables address extensions altogether
# $recipient_delimiter = ‘+’; # undef disables address extensions altogether
# when enabling addr extensions do also Postfix/main.cf: recipient_delimiter=+Cuối cùng, thay đổi:
$final_virus_destiny = D_DISCARD;
$final_banned_destiny = D_BOUNCE;
$final_spam_destiny = D_DISCARD;
$final_bad_header_destiny = D_BOUNCE;thành:
$final_virus_destiny = D_REJECT;
$final_banned_destiny = D_REJECT;
$final_spam_destiny = D_PASS;
$final_bad_header_destiny = D_PASS;#$final_virus_destiny = D_DISCARD;
#$final_banned_destiny = D_BOUNCE;
#$final_spam_destiny = D_DISCARD;
#$final_bad_header_destiny = D_BOUNCE;Sau khi áp dụng việc thay đổi, file /etc/amavisd/amavisd.conf sẽ giống như thế này:
[xem lệnh]
Trong đó, amavisd-new là ứng dụng gắn kết Postfix và SpamAssassin/ClamAV với nhau. Khi cài đặt ClamAV, 1 trình tự công việc đã được thiết lập để cập nhật cơ sở dữ liệu nhận dạng cho ClamAV 3 giờ 1 lần. Nhưng tính năng chỉ hoạt động khi ta kích hoạt bên trong /etc/sysconfig/freshclam and /etc/freshclam.conf:
vi /etc/sysconfig/freshclam
và chú thích bên ngoài dòng FRESHCLAM_DELAY ở phía cuối như sau:
## When changing the periodicity of freshclam runs in the crontab,
## this value must be adjusted also. Its value is the timespan between
## two subsequent freshclam runs in minutes. E.g. for the default
##
## | 0 */3 * * * …
##
## crontab line, the value is 180 (minutes).
# FRESHCLAM_MOD=## A predefined value for the delay in seconds. By default, the value is
## calculated by the ‘hostid’ program. This predefined value guarantees
## constant timespans of 3 hours between two subsequent freshclam runs.
##
## This option accepts two special values:
## ‘disabled-warn’ … disables the automatic freshclam update and
## gives out a warning
## ‘disabled’ … disables the automatic freshclam silently
# FRESHCLAM_DELAY=
### !!!!! REMOVE ME !!!!!!
### REMOVE ME: By default, the freshclam update is disabled to avoid
### REMOVE ME: network access without prior activation
#FRESHCLAM_DELAY=disabled-warn # REMOVE ME
vi /etc/freshclam.confchú thích bên ngoài dòng Example:
[…]
# Comment or remove the line below.
#Example
[…]Bước tiếp theo, tạo đường dẫn khởi động cho ClamAV và amavisd-new, cập nhật ClamAV và khởi động cả 2 dịch vụ đó:
chkconfig –levels 235 amavisd on
chkconfig –levels 235 clamd.amavisd on
/usr/bin/freshclam
/etc/init.d/amavisd start
/etc/init.d/clamd.amavisd startTiếp theo, cấu hình Postfix để có thể gửi mail thông qua amavisd-new:
postconf -e ‘content_filter = amavis:[127.0.0.1]:10024’
postconf -e ‘receive_override_options = no_address_mappings’Sau đó thêm dòng lệnh sau vào /etc/postfix/master.cf:
vi /etc/postfix/master.cf
[…]
amavis unix – – – – 2 smtp
-o smtp_data_done_timeout=1200
-o smtp_send_xforward_command=yes127.0.0.1:10025 inet n – – – – smtpd
-o content_filter=
-o local_recipient_maps=
-o relay_recipient_maps=
-o smtpd_restriction_classes=
-o smtpd_client_restrictions=
-o smtpd_helo_restrictions=
-o smtpd_sender_restrictions=
-o smtpd_recipient_restrictions=permit_mynetworks,reject
-o mynetworks=127.0.0.0/8
-o strict_rfc821_envelopes=yes
-o receive_override_options=no_unknown_recipient_checks,no_header_body_checks
-o smtpd_bind_address=127.0.0.1Khởi động lại Postfix để áp dụng các sự thay đổi:
/etc/init.d/postfix restart
Cài đặt Razor, Pyzor và DCC đồng thời cấu hình SpamAssassin
Razor, Pyzor và DCC là các bộ lọc email với tính năng tương tác lẫn nhau. Để cài đặt Razor và Pyzor, gõ lệnh sau:
yum install perl-Razor-Agent pyzor
Khởi tạo cả 2 dịch vụ:
chmod -R a+rX /usr/share/doc/pyzor-0.5.0 /usr/bin/pyzor /usr/bin/pyzord
chmod -R a+rX /usr/lib/python2.6/site-packages/pyzor
su -m amavis -c ‘pyzor –homedir /var/spool/amavisd discover’
su -m amavis -c ‘razor-admin -home=/var/spool/amavisd -create’
su -m amavis -c ‘razor-admin -home=/var/spool/amavisd -register’Và cài đặt DCC theo cách sau:
cd /tmp
wget http://www.dcc-servers.net/dcc/source/dcc-dccproc.tar.Z
tar xzvf dcc-dccproc.tar.Z
cd dcc-dccproc-1.3.126
./configure –with-uid=amavis
make
make install
chown -R amavis:amavis /var/dcc
ln -s /var/dcc/libexec/dccifd /usr/local/bin/dccifdBước tiếp theo, chúng ta cần “thông báo” cho SpamAssassin để sử dụng 3 chương trình này. Chỉnh sửa file /etc/mail/spamassassin/local.cf như sau:
vi /etc/mail/spamassassin/local.cf
# These values can be overridden by editing ~/.spamassassin/user_prefs.cf
# (see spamassassin(1) for details)# These should be safe assumptions and allow for simple visual sifting
# without risking lost emails.#required_hits 5
#report_safe 0
#rewrite_header Subject [SPAM]# dcc
use_dcc 1
dcc_path /usr/local/bin/dccproc#pyzor
use_pyzor 1
pyzor_path /usr/bin/pyzor#razor
use_razor2 1
razor_config /var/spool/amavisd/razor-agent.conf#bayes
use_bayes 1
use_bayes_rules 1
bayes_auto_learn 1Tiếp theo, kích hoạt plugin DCC trong SpamAssassin. Mở /etc/mail/spamassassin/v310.pre và bỏ ghi chú của dòng loadplugin Mail::SpamAssassin::Plugin::DCC:
vi /etc/mail/spamassassin/v310.pre
[…]
# DCC – perform DCC message checks.
#
# DCC is disabled here because it is not open source. See the DCC
# license for more details.
#
loadplugin Mail::SpamAssassin::Plugin::DCC
[…]Kiểm tra lại toàn bộ thiết lập của SpamAssassin bằng lệnh sau:
spamassassin –lint
Nếu thành công, thì chương trình sẽ không thông báo gì cả. Sau đó, chạy lệnh:
/etc/init.d/amavisd restart
Tiến hành cập nhật các quy luật của SpamAssassin như sau:
sa-update –no-gpg
Tạo tham số cron để bộ quy luật này cập nhật thường xuyên và có trình tự. Chạy lệnh sau:
crontab -e
để mở thẻ chỉnh sửa cron. Tạo tham số sau:
23 4 */2 * * /usr/bin/sa-update –no-gpg &> /dev/null
Có nghĩa là việc cập nhật sẽ được tiến hành hàng ngày vào lúc 4.23h.
Cảnh báo về Quota Exceedance
Để thiết lập nhận thông tin cảnh báo đối với những tài khoản sử dụng email vượt quá mức quota cho phép, tạo file /usr/local/sbin/quota_notify:
[xem lệnh]
Hãy chắc chắn rằng bạn đã điều chỉnh các biến phù hợp ở trên đầu (đặc biệt là địa chỉ postmaster@domain.tld)
Và tiếp đó, tạo file thực thi đoạn mã này:
chmod 755 quota_notify
Và gõ lệnh:
crontab -e
để tạo tham số cron cho đoạn mã đó:
0 0 * * * /usr/local/sbin/quota_notify &> /dev/null
Kiểm tra Postfix
Để kiểm tra chắc chắn Postfix có hoạt động với SMTP-AUTH và TLS, chạy lệnh sau:
telnet localhost 25
Sau khi bạn thiết lập 1 kết nối bất kỳ đến Postfix mail server, gõ lệnh:
ehlo localhost
Và sẽ thấy những dòng thông báo sau:
250-STARTTLS
và
250-AUTH LOGIN PLAIN
Nghĩa là mọi thứ đều ổn.
[root@server1 sbin]# telnet localhost 25
Trying ::1…
Connected to localhost.
Escape character is ‘^]’.
220 server1.example.com ESMTP Postfix
ehlo localhost
250-server1.example.com
250-PIPELINING
250-SIZE 10240000
250-VRFY
250-ETRN
250-STARTTLS
250-AUTH LOGIN PLAIN
250-AUTH=LOGIN PLAIN
250-ENHANCEDSTATUSCODES
250-8BITMIME
250 DSN
quit
221 2.0.0 Bye
Connection closed by foreign host.
[root@server1 sbin]#Gõ:
quit
để quay trở lại hệ thống.
Đồng bộ hóa các cơ sở dữ liệu và kiểm tra
Để thực hiện bước này, gõ câu lệnh sau:
mysql -u root -p
USE mail;
Và tối thiểu, bạn phải tạo những thành phần sau trong bảng domains và users:
INSERT INTO `domains` (`domain`) VALUES (‘example.com’);
INSERT INTO `users` (`email`, `password`, `quota`) VALUES (‘sales@example.com’, ENCRYPT(‘secret’), 10485760);Hãy cẩn thận khi dùng cú pháp ENCRYPT trong lệnh INSERT thứ 2 để mã hóa mật khẩu.
Nếu muốn tiếp tục thêm dữ liệu vào các bảng khác, thì hãy làm theo cách sau:
INSERT INTO `forwardings` (`source`, `destination`) VALUES (‘info@example.com’, ‘sales@example.com’);
INSERT INTO `transport` (`domain`, `transport`) VALUES (‘example.com’, ‘smtp:mail.example.com’);Thoát khỏi MySQL shell, gõ lệnh:
quit;
Đối với nhiều người, sẽ dễ dàng và đơn giản hơn rất nhiều nếu quản lý và điều khiển MySQL bằng giao diện, qua đó, có thể sử dụng thêm phpMyAdmin (ở bài viết này là http://192.168.0.100/phpMyAdmin/ hoặc http://server1.example.com/phpMyAdmin/) để quản lý cơ sở dữ liệu mail. Bên cạnh đó, mỗi khi tạo mới tài khoản, hãy nhớ sử dụng chức năng ENCRYPT để mã hóa password:
Và tương tự, bảng dữ liệu forwardings sẽ trông như thế này:
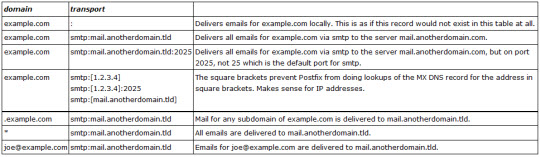
Bảng transport:
Gõ lệnh:
man transport
để biết thêm thông tin chi tiết cụ thể.
Gửi email Welcome để tạo Maildir
Khi bạn tạo 1 tài khoản email mới, và thử lấy email từ đó (với chuẩn POP3/IMAP), thông thường sẽ nhận được thông báo lỗi rằng Maildir không tồn tại. Maildir sẽ tự động được tạo ra khi email đầu tiên được tạo đối với tài khoản đầu tiên tương ứng. Trước tiên, cài đặt gói mailx:
yum install mailx
Để gửi email welcome tới địa chỉ sales@example.com, làm như sau:
mailx sales@example.com
Bạn sẽ nhận được thông báo của tiêu đề, gõ bất kỳ nội dung nào (ví dụ Welcome), sau đó nhấn Enter. Trong dòng tiếp theo, gõ nội dung thông báo. Khi hoàn tất phần nội dung, nhấn Enter để bắt đầu 1 dòng mới, tại đây nhấn CTRL+D:
[root@server1 ~]# mailx sales@example.com
Subject: Welcome <-- ENTER
Welcome! Have fun with your new mail account. <-- ENTER
<-- CTRL+D
EOT
[root@server1 ~]#Cài đặt SquirrelMail
SquirrelMail là hệ thống quản lý webmail có giao diện, cho phép người sử dụng gửi và nhận email thông qua trình duyệt. Để cài đặt SquirrelMail, gõ lệnh sau:
yum install squirrelmail php-pear-DB
Sau đó, khởi động lại Apache:
/etc/init.d/httpd restart
SquirrelMail có đi kèm với 1 số plugin có sẵn, nhưng thật không may, không có plugin nào hỗ trợ người dùng thay đổi mật khẩu email trong cơ sở dữ liệu MySQL. Nhưng thay vào đó, các bạn có thể sử dụng plugin thay thế sau:
cd /usr/share/squirrelmail/plugins
wget http://www.squirrelmail.org/countdl.php?fileurl=http%3A%2F%2Fwww.squirrelmail.org%2Fplugins%2Fchange_sqlpass-3.3-1.2.tar.gz
tar xvfz change_sqlpass-3.3-1.2.tar.gz
cd change_sqlpass
cp config.php.sample config.phpTiếp theo, chúng ta phải điều chỉnh config.php, thay đổi các biến sau: $csp_dsn, $lookup_password_query, $password_update_queries, $password_encryption, $csp_salt_static, và $csp_delimiter như sau và chú thích bên ngoài $csp_salt_query:
vi config.php
[…]
$csp_dsn = ‘mysql://mail_admin:mail_admin_password@localhost/mail’;
[…]
$lookup_password_query = ‘SELECT count(*) FROM users WHERE email = “%1” AND password = %4’;
[…]
$password_update_queries = array(‘UPDATE users SET password = %4 WHERE email = “%1″‘);
[…]
$password_encryption = ‘MYSQLENCRYPT’;
[…]
$csp_salt_static = ‘LEFT(password, 2)’;
[…]
//$csp_salt_query = ‘SELECT salt FROM users WHERE username = “%1″‘;
[…]
$csp_delimiter = ‘@’;
[…]File sau khi chỉnh sửa sẽ trông giống thế này:
[xem lệnh]
Mặt khác, plugin Change SQL Password cũng phụ thuộc phần lớn vào khả năng tương thích của các hệ thống plugin như sau:
cd /usr/share/squirrelmail/plugins
wget http://www.squirrelmail.org/countdl.php?fileurl=http%3A%2F%2Fwww.squirrelmail.org%2Fplugins%2Fcompatibility-2.0.16-1.0.tar.gz
tar xvfz compatibility-2.0.16-1.0.tar.gzBước tiếp theo, di chuyển tới mục điều chỉnh SquirrelMail và “thông báo” tới SquirrelMail rằng chúng ta sẽ sử dụng Courier như chuẩn POP3 và IMAP server, đồng thời kích hoạt 2 plugin Change SQL Password và Compatibility:
/usr/share/squirrelmail/config/conf.pl
Menu điều khiển sẽ hiển thị:
[xem lệnh]
Điều cuối cùng cần thực hiện là chỉnh sửa file /etc/squirrelmail/config_local.php và chú thích bên ngoài biến $default_folder_prefix – nếu không thực hiện bước này, bạn sẽ nhận được thông báo lỗi trong SquirrelMail sau khi đăng nhập: Query: CREATE “Sent” Reason Given: Invalid mailbox name.
vi /etc/squirrelmail/config_local.php
/**
* Local config overrides.
*
* You can override the config.php settings here.
* Don’t do it unless you know what you’re doing.
* Use standard PHP syntax, see config.php for examples.
*
* @copyright © 2002-2006 The SquirrelMail Project Team
* @license http://opensource.org/licenses/gpl-license.php GNU Public License
* @version $Id: config_local.php,v 1.2 2006/07/11 03:33:47 wtogami Exp $
* @package squirrelmail
* @subpackage config
*///$default_folder_prefix = ”;
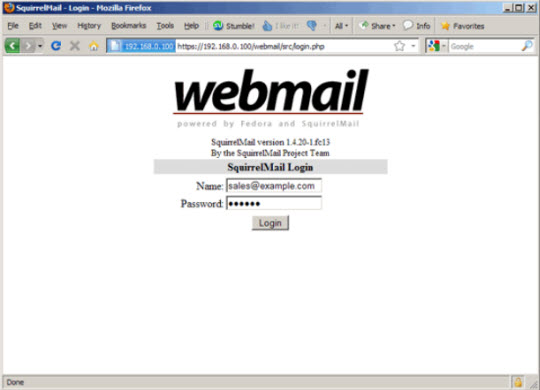
?>Mở trình duyệt và gõ địa chỉ sau: http://server1.example.com/webmail hoặc http://192.168.0.100/webmail để truy cập SquirrelMail, sử dụng tài khoản email (ở đây là sales@example.com) và mật khẩu khai báo bên trên:
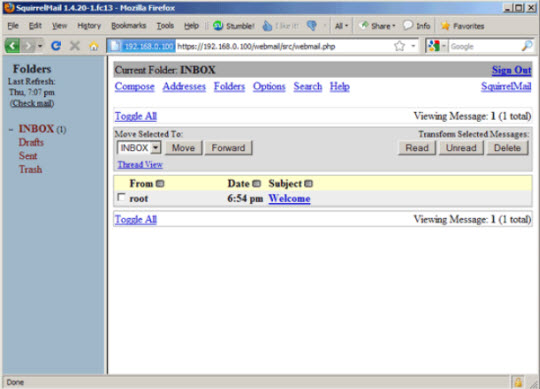
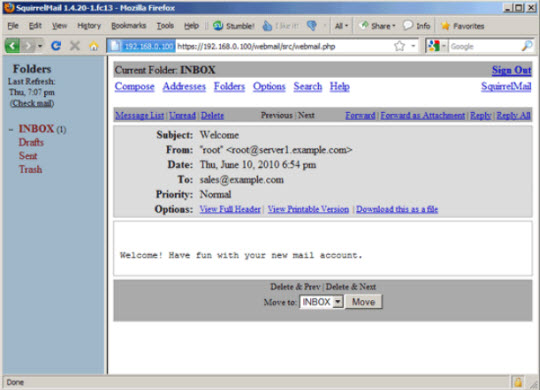
Bạn sẽ thấy email welcome trong mục inbox:
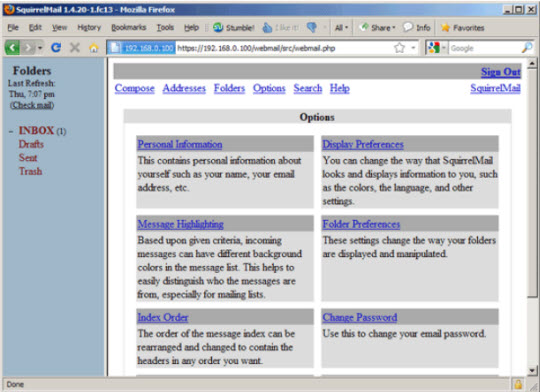
Để thay đổi mật khẩu, chọn Options > Change Password:
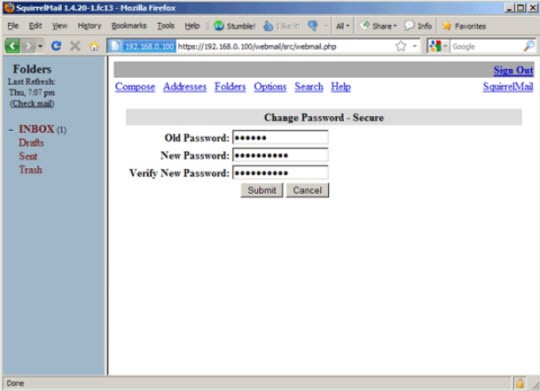
Gõ mật khẩu hiện tại và mật khẩu mới 2 lần:
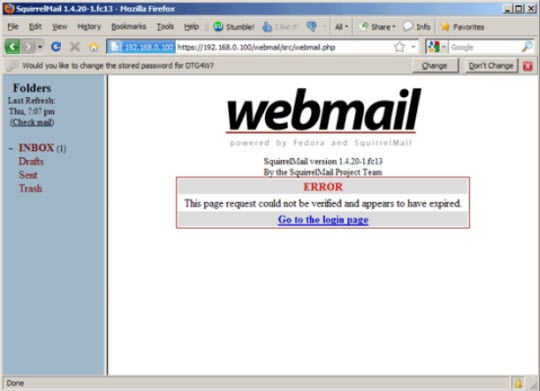
Ngay sau khi đổi mật khẩu, bạn sẽ bị “văng” ra khỏi cửa sổ làm việc hiện tại và phải tiến hành đăng nhập lại:
Chúc các bạn thành công!